Translate

Sunday, 22 May 2016

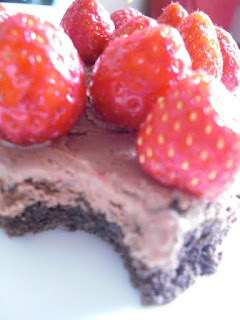
No-Bake Bailey's Chocolate Strawberry Cheesecake

This recipe uses a no-bake cheesecake and a microwave cake as a base.  Easier to make than pie!  Just make the individual parts and then layer.  Oh and there is no glaze on the strawberries.  We were just lucky enough to buy really awesome mini-strawberries that were sweet and juicy.  You can always glaze it by brushing with a bit of melted strawberry jam if you like.

Ingredients


Cake:

1 cup of flour
1/4 cup of cocoa powder
1/2 cup of splenda (Likanto sugar works well too!)
2 tsp baking powder
1 tsp baking soda
1/2 cup of milk (anything from skim to low-cal nut milks will work)
1 egg
1 tbsp lemon juice

Cheesecake:

250g (about 1 cup) of low-fat cream cheese
120 g (about 1 cup) semi-sweet/dark chocolate
1 1/2 shots (about 60 ml)Bailey's Irish Cream
1-2 tbsp of water

1 pint Strawberries for

Instructions (Cake)

  1. Sift all the dry ingredients together in a bowl. 
  2. Whisk the milk, egg, and lemon juice together.  
  3. Add to the egg mixture to the dry ingredients and whisk until smooth.  Add more milk or water as necessary so that it is not too thick.  (A spoon should sink into it slowly)
  4. Poor the mix into flat microwavable container (silicone baking dishes are excellent for this) and microwave on high for 10-14 minutes.  Check after 10 minutes to see if the cake has finished cooking. (It should be dry on top.  You can also insert a toothpick into the middle. When nothing sticks it is cooked.) 
  5. Remove from cooking pan and let cool.

(Cheesecake)

  1. In a microwavable bowl, melt the chocolate in 30 second intervals. 
  2. Once smooth, using a mixer or hand blender (immersion blender) blend the melted chocolate with the water, baileys, and cream cheese.   Note: The water is important here as it will seize the chocolate giving the mix that solid "baked cheesecake" texture.  If you are using milk chocolate, use less water.  If you are using dark chocolate, you may need more.  The higher the cocoa content, the harder the chocolate will be.
  3. Spread the cheese mixture evenly over the cake and refrigerate to set.
  4. Cut the tops off of the strawberries, wash and dry.  Place the strawberries on top of the set cheesecake evenly or as you prefer.  
  5. Cut & serve. Enjoy!


Thursday, 12 May 2016

Lighter Chocolate Covered Digestive Biscuits


These are the most addictive digestives biscuits ever!  They are lower in calories than the store bought ones because we use less butter and no sugar, but there is a load of chocolate!   :)

Ingredients

(Makes 2-3 dozen cookies depending on size)
1 1/2 cups of all purpose flour
1/4 cup of whole wheat
5 tbsp of Splenda
1 tsp of baking powder
1/2 tsp baking soda
3 tbsp of low calorie butter (I use I can't believe it's not butter light)
1/4 cup of almond milk/cashew milk
pinch of salt
Chocolate to cover (about 300 g if cover 1 side.  Double that amount to cover both sides.)

Instructions  (preheat ovwen 375 degrees F)

  1. Mix all the dry ingredients together in a large bowl.
  2. Rub the butter into the dry mix with your hands. (This is much faster than cutting it in.)  The mix should resemble fine crumbs.
  3. Add in the nut milk and still until the dough comes together.  (You may need to add more milk.)  It should feel tacky but not too soft like a bread dough.
  4. On a Silpat or parchment paper roll out the dough until it is wafer thin. (about 3-4 millimeters)  Cut it to the shape you want and gather the scraps to roll out again.  You may need to let the dough rest as glutton will form.  
  5. Bake for 7 minutes, rotate the cookies and bake for another 7 minutes.  The top of the cookies should be golden brown.  Check to see that the bottom is also brown.  If the bottom has no browned, flip the cookies over and bake for another 5-6 minutes until that side is about the same.  
  6. Cool on a rack.
  7. In a microwaveable bowl, heat the chocolate in 1 minute intervals, stirring between heating to melt evenly.  (If your microwave is strong, heat in shorter burst such as 45 seconds) 
  8. Spread the chocolate on to one side of the cookie and let it harden in the refrigerator for at least 1 hour.  (Coat both sides and cool on parchment for easy removal)


Monday, 2 May 2016

Butter-less Cheese Croissants

Croissants made without butter???  HOW???  Of course it is possible.  We use cheese in place of the butter to laminate the dough, then you get all the layers but with less fat and calories.  Adding cheese to a regular croissant always taste too greasy for me, but this way you get the crispy, flaky croissant with loads of cheese!  Pictured below is 2 regular cheese croissants and 2 whole wheat one hence the brown colour,  It's a bit more dense of course as the bran weighs things down, but it still taste really good.

Butter-less Cheese Croissants (White & Whole Wheat variations)

Ingredients

  • 2 cups all purpose flour or whole wheat flour
  • 2 tsp instant yeast
  • 1 tbsp splenda
  • 1/2-3/4 cup of water
  • 3-4 cups of finely shredded cheese (use cheeses such as cheddar/gouda/havarti, mozzarella works mixed with other cheese like cheddar but not alone) 

Instructions

Makes about 18 medium sized croissants or 12 large
​1. Combine the flour, yeast, and Splenda and mix well.  Add the water and stir until the dough starts coming together and turn out on a lightly floured table. 
2. Press together and lightly knead the dough until all the flour is moist and the dough forms a rough ball.  DO NOT OVER KNEAD. (You will develop gluten as you fold the dough)  Use more flour as needed to prevent sticking.
3. Flatten the dough into a square until it is about 11x11 and roughly 1 inch thick.  
4. Spread the shredded cheese on top of the dough in a diamond shape so that the points are in the center of the dough's sides.  (see diagram)
 
5. Fold the corners of the dough towards the center around your cheese diamond and seal the edges.

6. Once the dough is sealed you can start rolling out your dough. Turn the square so that the flat sides are facing you and press down to form ridges with your rolling pin from the middle to the top. Then do the same towards the bottom.  This should seal your dough completely.  Roll the dough out into a rectangle so that the long side is 3x the width.  
7. Now we will perform a 'tri-fold'.  (Don't worry.  It's easy)  Visualize dividing your dough into 3 equal sections top to bottom. Now fold the top down over the middle and bottom over the top that.  You should now have a square again.  
8. Dust the table with more flour to prevent sticking and lightly dust the dough.  Give it a quarter turn so that the folded edges are now on the side and roll out to make a long rectangle again.  Make the Tri-fold again.  You may find that the dough is now very tight so let it rest for 15-20 minutes.
9.  Roll out and fold 3 more times, letting the dough rest as needed.  
10. Now the dough is ready to be cut.  Using your rolling pin, roll the dough out into a large rectangle until the dough is about 1/4 inch thick.  
11. Cut the dough into triangles slicing from one edge to the other.  (Hint: If you want the traditional crescent shape, cut the triangles wider.  This lets you curl the corners around.)  For smaller croissants, cut the dough in half lengthwise, then cut into triangles.
12.  Separate the individual triangles and spray some water on the dough. (It helps it adhere to the shape.)  Starting from the base of the triangle, roll the dough towards the point.  To make the crescent shape, take the 2 corners of the rolled dough and curl it to meet in the middle in front of the point.  Now you have a perfect croissant! Repeat with all the triangles of dough.
13. Let the dough rise until triple in size or when the indent stays when you poke it. (about 2-3 hours depending on temperature.)
14. Preheat the oven to 400 degrees and spray the croissants generously with water.  Bake for 10 minutes, then spray with more water and rotate.  Bake for another 12 -15 minutes until golden brown.
15. Cool on a rack and enjoy!
This is a Pizza variation.  I added pepperoni to the triangle before rolling it.  Taste awesome.
See it comes out nice and cheesy!

Saturday, 30 April 2016

Light Double Chocolate Marble Kugelhopf

A Weissenstein favourite.  This Kugelhopf is made with Splenda and almond milk to reduce calories where it isn't necessary (so we can have more chocolate!)  It is more like a fluffy bread then cake, however with the large dose of chocolate and soft, melt-in-your-mouth interior, it's best described as a chocolate cloud!  This was baked in a loaf pan instead of a ring pan as the ring pan was not available that day, but the taste is still amazing so use what you have!


Ingredients


  • 2 1/4 cups All Purpose Flour
  • 1 cup Splenda
  • 2 tbsp I can't believe it's not butter (or regular butter if you don't care about fat/calories)
  • 1 1/2 tsp instant yeast
  • 1/2 cup almond milk/skim milk
  • 2-3 tbsp hot water (to warm milk)
  • 1 large egg (beaten)
  • 3 tbsp Splenda
  • 3 tbsp cocoa powder
  • 1 tbsp hot water
  • 2/3 cup milk chocolate chips
  • 2/3 cup semisweet chocolate chips 
  • 2 tsp vanilla extract

Instructions


Makes 1 large kugelhopf 


 Making the dough base

  1. In a large bowl, sift together flour and 1 cup of Splenda, then cut in the butter until it resembles fine crumbs.
  2. Heat the almond milk with 2-3 tbsp of hot water until it is feels warm to the touch and stir in the yeast. Let it sit until bubbles form.
  3. Make a well in the flour and pour in yeast mixture.  Stir until the dough starts coming together.  Add vanilla and beaten egg, then continue kneading the dough (lifting the sides and folding it over) until it starts becoming smooth.  (Don't worry if it looks more like paste than dough.  As the dough is resting, gluten will form and the dough will become more elastic and bread-like.)  
  4. Divide the dough into equal portions and place one half into another large bowl.
  5. Let the vanilla dough rest for 20-30 minutes or until double in size.  
Meanwhile, make the Chocolate Dough!

Chocolate Dough:

  1. In a small container mix together 3 tbsp of Splenda, 3 tbsp cocoa powder, and 1 tbsp of hot water.  Add more water as necessary to make a smooth paste.
  2. Kneed the cocoa paste into the dough until it is an even brown colour.  (This is VERY messy.  You will need your scraper to remove dough from your hands! Do not be afraid if it takes a while to incorporate the chocolate paste (it's worth it)  I suggest you keep it in the bowl to mix rather than on a table. Less to clean.
  3. Once the dough is smooth, let is rest for 20-30 minutes until it is double in size.

Putting it together:

  1. Knock down both bowls of dough and stack them one on top of the other on a floured bench.
  2. Roll out the dough into a good sized square and fold it in half.  This will give you a good layering effect.  (Hint:  Do not fold too many times as your layers will be too thin and you won't be able to see the marbling.)
  3. Spread the chocolate chips evenly onto the square and roll it into a log.
  4. If using a ring pan, place the log inside the ring of the join the ends together.  If using a loaf pan, pinch the ends and fold under the log if possible, then place it in the pan. 
  5. Let rise until almost triple in size.
  6. Preheat your oven to 350 degrees F and lower your racks to give the kugalhopf enough space to rise as it bakes.  (And it will!)
  7. Bake for 20-25 minutes, turning after 10 minutes for even baking.
  8. Remove from pan, cool on a rack & enjoy!


Award winning Sugar-free Coconut Macaroons

This recipe was submitted to the Home Baking Competition in 2013 and won!  It has a moist chewy center and is crisp on the outside.  Splenda was used as the sugar substituted but you can try stevia or lankanka sugar (or monk fruit sugar).


Ingredients


  • 1 egg + 2 egg whites
  • 1 cup Splenda
  • 1 tsp vanilla extract
  • ½ cup whole wheat flour
  • 3 cups unsweetened dried coconut (medium or fine)


Makes 12 macaroons

Preheat oven to 325˚ F


  1. Separate the egg placing the whites together in a metal bowl. Add ¾ cup of Splenda to the egg whites and whip over warm water until you get stiff peaks. 
  2. In a separate bowl, beat the egg yolk with remaining ¼ cup of Splenda and vanilla extract until smooth and creamy.
  3. Whisk the flour and coconut together until well blended and add it to the egg yolk mixture. 
  4. Fold egg whites into the coconut mixture until all of it is moist.
  5. Using 2 tablespoons or your hands, form small balls and place on a cookie sheet lined with parchment paper.
  6. Bake for 15-20 minutes, turning halfway to brown evenly.  
  7. Let the macaroons cool on racks so it stays crispy and then enjoy!


Recipes, recommendations, and more!

This blog contains recipes for pastries, breads, and other delicious morsels served to Her Royal Highness, the Princess of Fluffy Kingdom and to His Royal Highness, the Prince of Weissenstein.  It will also contain recommendations for food, types and recipes for blends of tea, and other drinks such as coffee, hot chocolate, juices etc.